How To Use CoParentCare
Welcome to our comprehensive guide to help you get the most out of CoParentCare. Whether you're new to our platform or looking to explore more features, this page will walk you through everything you need to know.
Quick Navigation
Getting Started
Create an Account
Start by registering for a new account. Click on the "Register" button in the top navigation bar and fill out the required information. You'll need to provide a valid email address, create a username, and set a secure password.
Set Up Your Profile
Complete your profile by adding a profile picture, bio, and other relevant information. Having a complete profile helps other users identify you and enhances your experience on the platform.
Connect with Co-Parents
Add your co-parent(s) as friends by going to "Add Friend" in the navigation bar. You can search for them by username or email. Once they accept your friend request, you'll be able to access all the co-parenting tools.
Explore the Dashboard
Once logged in, you'll have access to your dashboard where you can see posts, notifications, and quick access to all tools. Take some time to explore the interface and familiarize yourself with the available features.
Select Your Co-Parent First
Select Your Co-Parent First
Before using any tools, you must select which co-parent you want to work with. This is a common point where new users get stuck. The "Select Friend" dropdown in the navigation controls which co-parent all the tools will be focused on.
How to Select a Friend:
- Look for "Tools" in the top navigation bar
- Click on "Tools" to open the dropdown menu
- Find the "Select Friend" dropdown at the top of the menu
- Click the dropdown and choose your co-parent's name
- The page will refresh, and all tools will now be focused on that person
Tools Menu Preview
Pro Tips for Getting Started
- Use a strong, unique password to protect your account
- Add a clear profile picture that's easily recognizable
- Complete your bio with relevant information about yourself
- Verify your email address to ensure you receive important notifications
- Always select a friend from the Tools menu before trying to use co-parenting features
Communication Tools
Chat Features
Our chat system provides a safe and effective way to communicate with your co-parent. Messages are private between you and your contact, and our AI-powered sentiment filter helps keep conversations positive and productive.
How to use the chat:
- Select the friend from the dropdown in the Tools menu
- Click on "Chat" in the Tools dropdown
- Type your message in the text box at the bottom
- Press Enter or click the send button
- Messages are delivered instantly and saved for future reference
Chat Tips
- Keep communications clear and focused on co-parenting topics
- Use positive language to maintain a healthy dialogue
- If you need to share important documents, use the file sharing feature
Video Calls
When text communication isn't enough, our video calling feature allows for face-to-face conversations. This is especially useful for more complex discussions or when visual context is needed.
Starting a video call:
- Select the friend from the dropdown in the Tools menu
- Click on "Video Call" in the Tools dropdown
- The system will prepare the video call room
- Your co-parent will receive a notification about the call
- Once they join, you'll be connected for your video conversation
Video Call Tips
- Ensure you have a stable internet connection for the best experience
- Find a quiet, well-lit environment for your calls
- Use headphones to improve audio quality and privacy

Notifications System
Stay updated with all activities related to your co-parenting journey through our notification system. You'll receive alerts for messages, calendar events, invoice updates, and more.
Managing notifications:
- Access your notifications by clicking the "Notifications" link in the navigation bar
- New notifications are indicated by a red badge with the number of unread items
- Click on a notification to be taken to the relevant page
- Mark notifications as read by clicking on them
Notification Tips
- Check your notifications regularly to stay updated
- Enable email notifications in settings to receive important alerts even when you're not on the platform
- Customize your notification preferences in your account settings
Example Notifications
New message from John
5 minutes agoCalendar event reminder: School pickup
1 hour agoInvoice #1234 has been approved
YesterdayParenting Tools
Parenting Plan
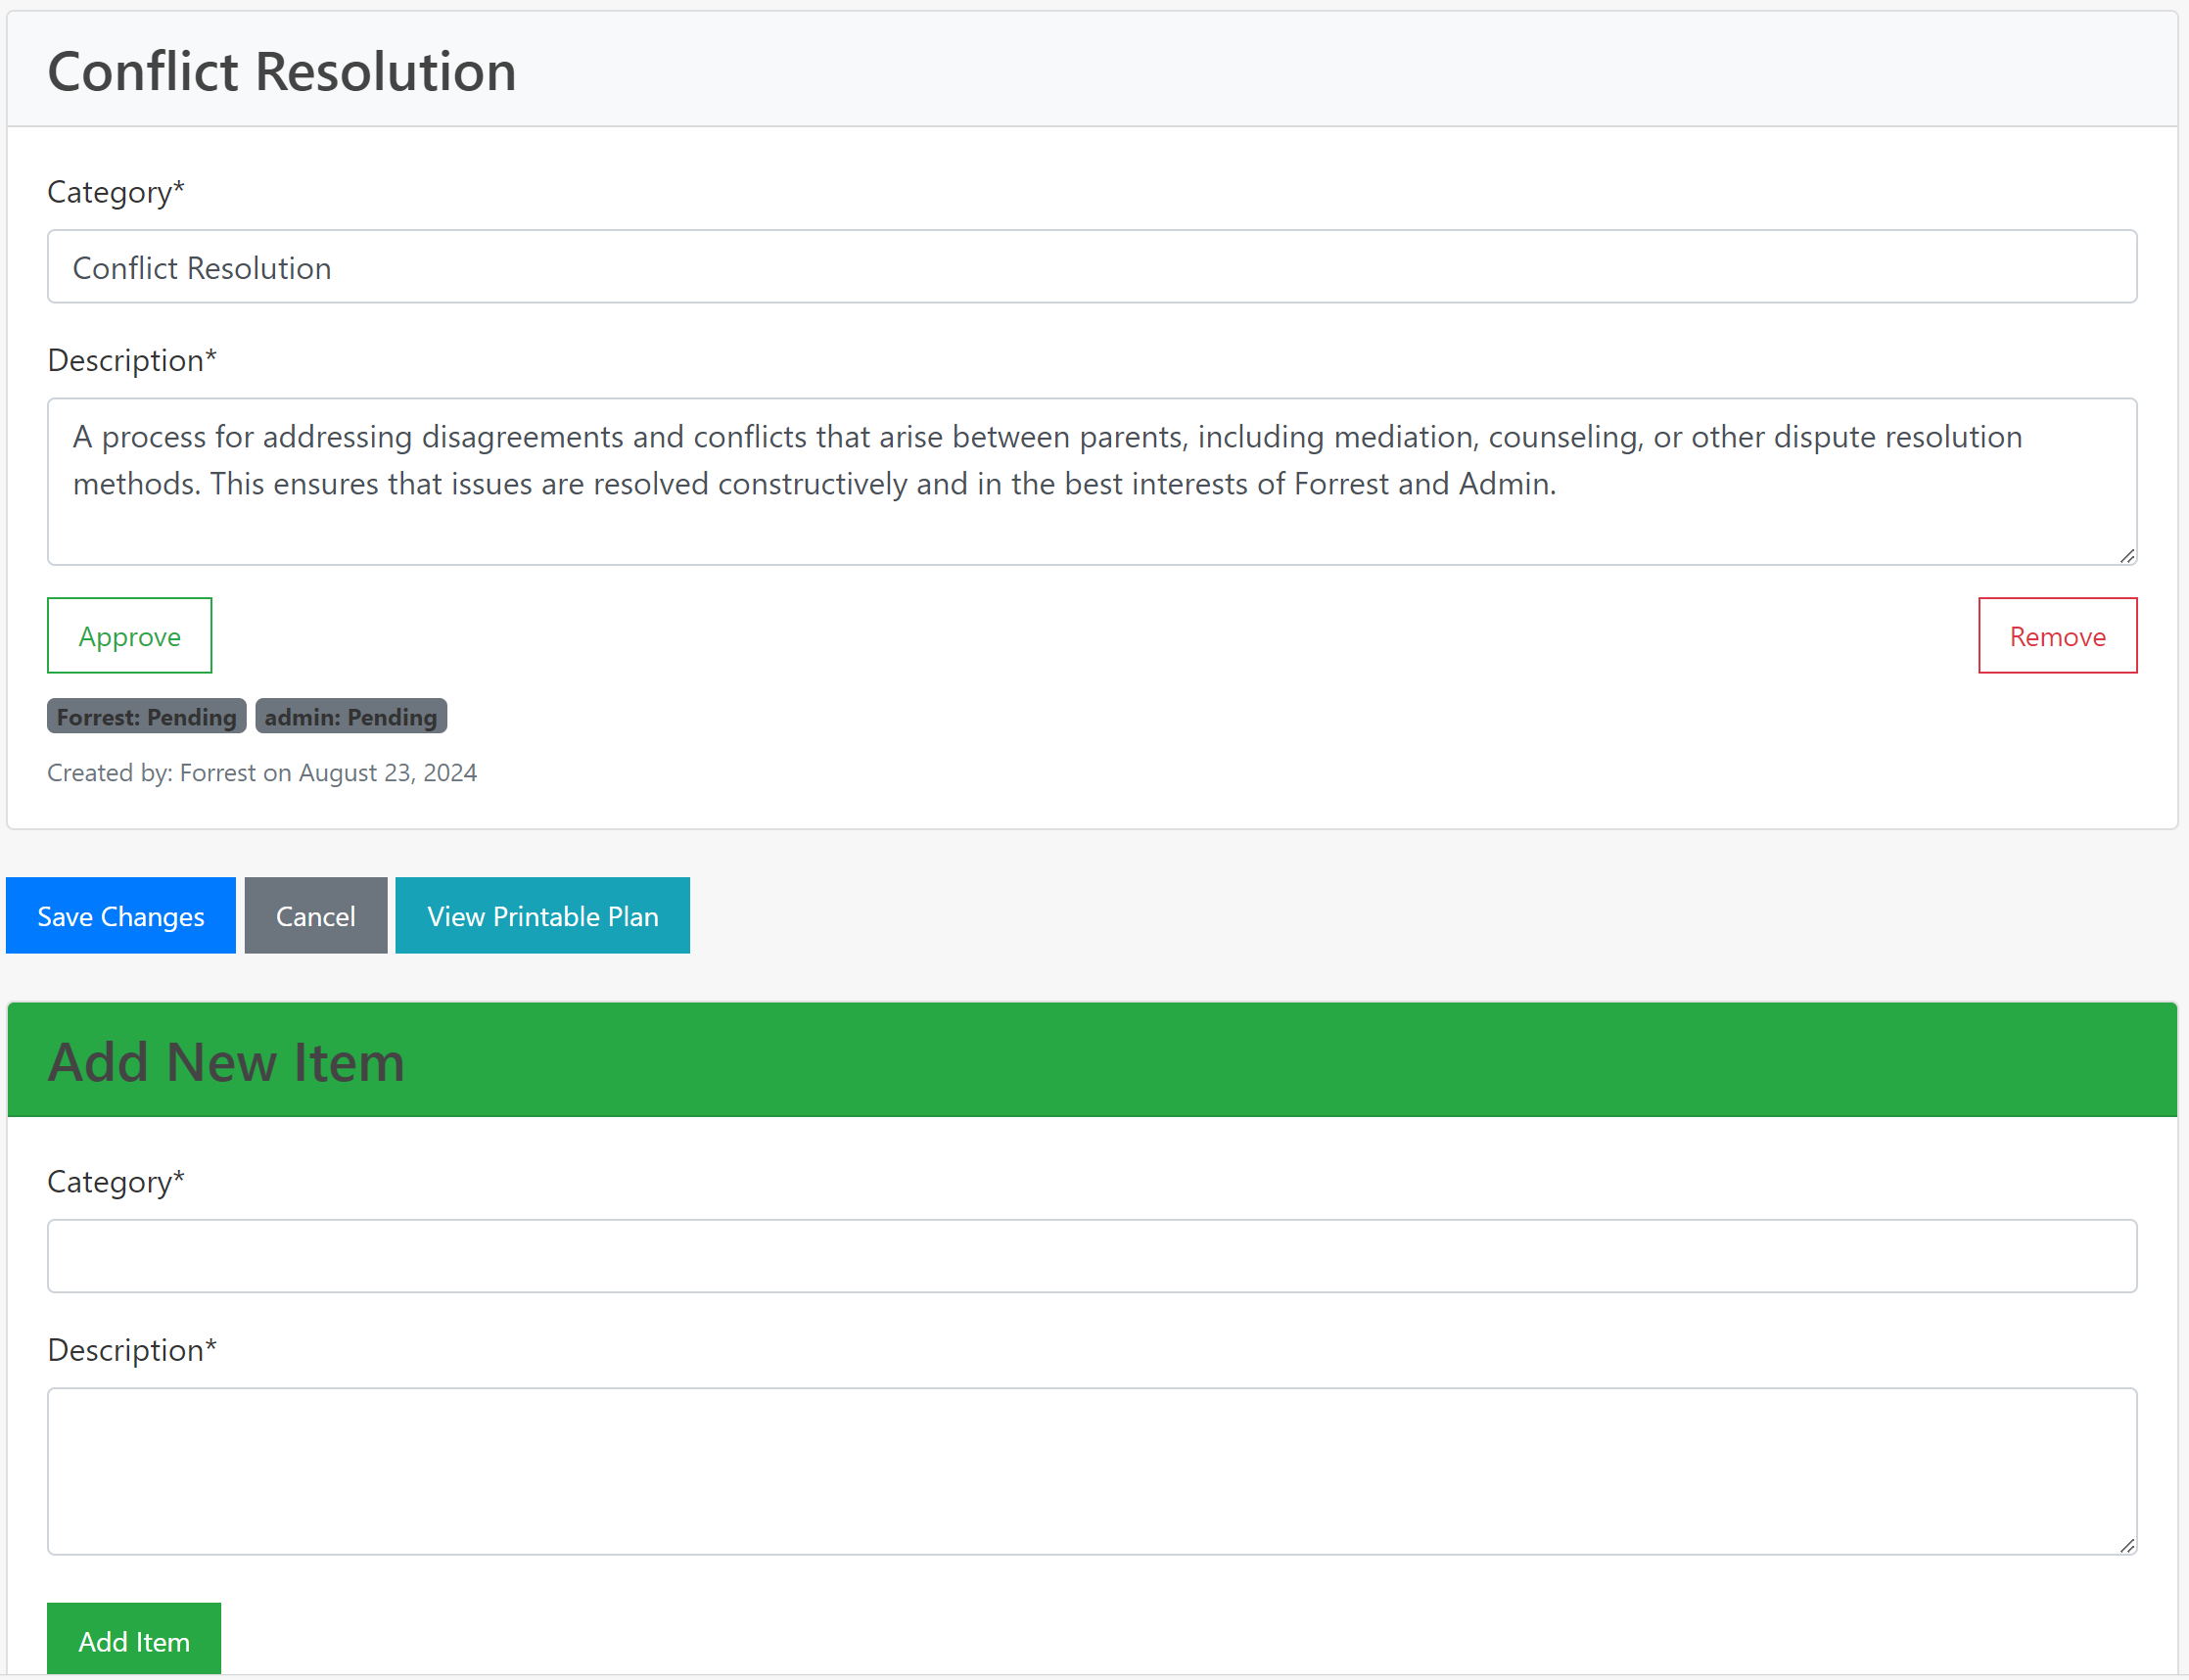
Create a Comprehensive Plan
Create a comprehensive parenting plan that outlines custody arrangements, visitation schedules, holiday plans, and other important aspects of co-parenting. Our AI-powered plan generator helps you create a customized plan that works for your unique situation.
Key Features:
- AI-assisted plan generation
- Customizable templates
- Digital signatures and approvals
- Version history tracking
- Printable documents for legal purposes
Shared Calendar
Keep Track of Important Dates
Keep track of important dates, events, and schedules with our shared calendar system. This tool helps coordinate pickups, drop-offs, school events, extracurricular activities, and other important occasions.
Key Features:
- Color-coded events for different types of activities
- Recurring event scheduling
- Notification reminders
- Event approval system
- Calendar statistics and insights

Invoice System
Manage Shared Expenses
Manage shared expenses and financial responsibilities with our invoice system. Create, approve, and track payments for child-related expenses such as medical bills, school fees, extracurricular activities, and more.
Key Features:
- Create and send invoices to co-parents
- Upload receipts and supporting documentation
- Customizable expense split percentages (50/50, 60/40, etc.)
- AI-powered receipt scanning for automatic data entry
- Track payment status through approval workflow
- Generate financial reports and summaries
Invoice Approval Flow - Step by Step
The invoice system uses a secure approval workflow to ensure both co-parents agree on shared expenses. Here's how the process works from start to finish:
Creating an Invoice (Sender)
- Go to Tools → Invoices (make sure you've selected your co-parent first)
- Click "Create Invoice" or "AI Invoice" to scan a receipt
- Enter the expense details:
- Description of the expense
- Total amount
- Date of expense
- Upload receipt image (optional but recommended)
- Set the expense split percentage (defaults to 50/50)
- Click "Submit" to send to your co-parent
AI Invoice Feature
Upload a photo of your receipt and our AI will automatically extract the date, amount, and description. You can review and edit before submitting.
Reviewing the Invoice (Receiver)
When you receive an invoice, you'll get a notification. Here's what to do:
- Go to Invoices → Pending Approvals
- Click on the invoice to view details
- Review the expense description, amount, split percentage, and any attached receipt
- Choose one of the following actions:
Approve
Click "Approve" to accept the expense. This confirms you agree with the amount and split.
Deny
Click "Deny" if you disagree. You can provide a reason (e.g., "Not a shared expense").
Making Payment (Receiver)
After approving an invoice, you need to pay your share:
- Pay your co-parent outside the app (bank transfer, cash, etc.)
- Go to the approved invoice in Invoices → Approved
- Click "Mark as Pending Payment" to indicate you've sent payment
- Optionally upload proof of payment (screenshot of transfer, etc.)
Confirming Payment (Sender)
When your co-parent marks an invoice as "Pending Payment":
- You'll receive a notification
- Verify you've received the payment
- Go to the invoice and click "Mark as Paid"
- The invoice is now complete and will appear in your Paid Invoices
Invoice Status Reference
| Status | Meaning | Who Can Act |
|---|---|---|
| Pending | Waiting for the receiver to review and approve/deny | Receiver |
| Approved | Receiver has agreed to the expense; payment due | Receiver (to mark payment sent) |
| Denied | Receiver has rejected the expense | Discussion needed |
| Pending Payment | Receiver claims payment has been sent | Sender (to confirm receipt) |
| Paid | Complete - payment received and confirmed | No action needed |
Invoice Tips
- Always upload receipts - This provides proof of the expense and helps avoid disputes
- Use descriptive titles - "School uniform - Sept 2024" is better than "Clothes"
- Set fair split percentages - The default is 50/50, but you can adjust based on your agreement
- Process invoices promptly - Don't let them pile up; review and respond within a few days
- Check the dashboard - Your home page shows pending invoices that need your attention
Subject Chooser
Collaborative Education Planning
The Subject Chooser tool helps co-parents work together to select educational subjects for their children. Create voting periods, add subjects, and collaborate on important educational decisions through a structured process.
Getting Started
- Access Subject Chooser from the main navigation "Tools" menu
- Add subjects using "Add Typical School Subjects" for quick setup
- Create a new voting period for your child
- Invite your co-parent to participate
- Review and finalize subject selections together
Creating Voting Periods
- Click "New Voting Period" from the dashboard
- Select your child and co-parent
- Set the voting period duration and subject limits
- Define core vs. elective subject requirements
- Launch the voting period to begin collaboration
Subject Chooser Tips
- Use "Add Typical School Subjects" to quickly populate subjects by grade level
- Set appropriate subject limits to avoid overwhelming choices
- Mark subjects as "mandatory" when they're non-negotiable
- Use the built-in tiebreaker system for fair resolution
- Review voting results together before finalizing
Subject Selection Process
Subject Management
Add and organize available subjectsVoting Period Setup
Create structured selection periodsCollaborative Selection
Both parents vote on subject prioritiesResults & Finalization
Review and approve final subject listAI-Powered Mediation
Resolve Disagreements Constructively
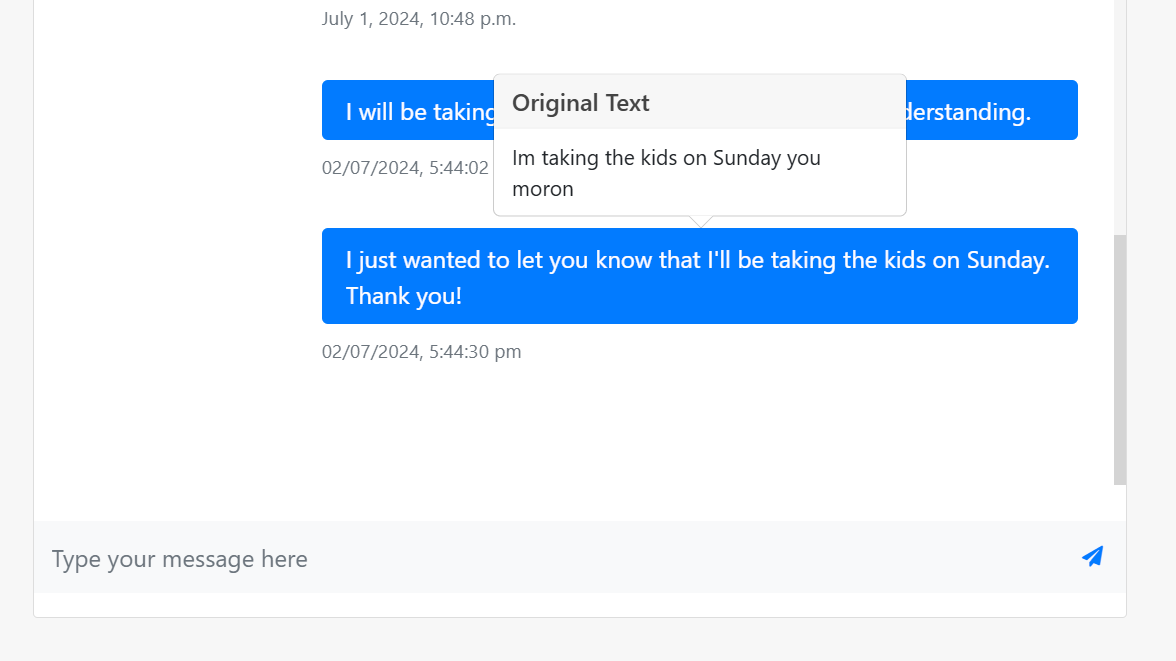
The Issue Resolution system helps co-parents work through disagreements in a structured, constructive way. Using AI-powered language filtering, your concerns are automatically reframed in neutral terms, reducing emotional escalation and helping both parents focus on finding solutions.
Key Benefits:
- Neutral Language: AI rewrites emotionally charged messages into constructive communication
- Structured Process: Guided mediation rounds ensure both voices are heard
- Safety Features: Automatic detection of escalation and safety concerns
- Resolution Tracking: Document agreements and action items for accountability
AI-Mediated Resolution
Transform conflicts into collaborative problem-solving
How Issue Resolution Works
Raise an Issue
When you have a concern to discuss with your co-parent:
- Go to Resolution from the dashboard or Tools menu
- Click "Raise New Issue"
- Select your co-parent and choose a category (Schedule, Communication, Health, Education, Finances, or Other)
- Write your concern in your own words - express yourself naturally
- Click "Preview" to see how your message will be neutralized
Co-Parent Response
Your co-parent receives a notification about the issue and can respond:
- They see the neutralized version of your concern (not your original wording)
- They write an understanding statement - showing they've read and understood the concern
- They provide their perspective and response
- Optionally, they can propose a solution
- Their response is also AI-filtered before you see it
Mediation Rounds (Up to 5)
If needed, you enter a structured mediation phase:
- Both parents take turns sending messages
- All messages are AI-filtered for neutral language
- After each round, the AI provides a progress summary and suggestions
- The system identifies common ground between your positions
- Up to 5 rounds of mediation are available
Resolution & Agreement
Once you've discussed the issue:
- Either parent can propose a resolution
- Select a resolution type: Mutual Understanding, Agreed Adjustment, Trial Solution, Escalate to Plan, or Professional Referral
- Define action items - specific steps each parent will take
- For trial solutions, set start and end dates
- Both parents must approve the resolution
- Once approved, the issue is marked as resolved
Issue Status Reference
| Status | Meaning | Next Action |
|---|---|---|
| Draft | Issue created but not yet sent | Preview and send to co-parent |
| Pending Response | Waiting for co-parent to respond | Co-parent should review and respond |
| In Mediation | Both parents are discussing the issue | Continue mediation rounds |
| Pending Resolution | A resolution has been proposed | Both parents need to approve |
| Resolved | Both parents approved the resolution | Follow through on action items |
| Escalated | Issue requires professional attention | Seek external mediation or support |
Tips for Successful Resolution
- Be specific: Clearly describe the issue and what outcome you're hoping for
- Focus on the child: Frame concerns in terms of your child's wellbeing
- Stay open: Read your co-parent's response with an open mind - the AI has filtered it for neutral language
- Use mediation fully: Take time in each round to understand the other perspective before responding
- Be solution-oriented: Propose practical solutions rather than dwelling on problems
- Follow through: Once a resolution is agreed, commit to the action items
Concern Journal
Private Documentation with AI Processing
The Concern Journal is your private space to document thoughts, concerns, and observations about your co-parenting situation. AI processing helps transform emotional entries into structured, factual documentation that can be used for productive discussions.
Key Features
- Private Entries: Only you can see your journal entries
- AI Processing: Transforms emotional text into factual documentation
- Pattern Detection: Automatically identifies recurring themes
- Escalation Options: When ready, escalate concerns to Mediation or Parenting Plan
- 48-Hour Cooldown: Prevents impulsive escalations with a cooling-off period
Creating an Entry
- Go to "Concern Journal" from the Tools menu or home page
- Click "New Entry" to start documenting
- Select a category (Schedule, Communication, Health, etc.)
- Write your thoughts freely - express yourself honestly
- Click "Preview" to see how AI structures your entry
- Save as a draft to review later, or confirm to save
Escalating a Concern
- Open a saved concern entry
- Review the AI recommendation on escalation
- Choose to escalate to Mediation or Parenting Plan
- Optionally include related concerns from the same pattern
- Confirm understanding that your co-parent will be notified
- The AI generates a neutral summary for the discussion
Concern Journal Tips
- Be honest: This is your private space - write freely without self-censoring
- Include details: Specific dates, times, and events help the AI create better structured entries
- Review patterns: When the system detects patterns, take time to reflect on the recurring themes
- Use the cooldown: The 48-hour cooldown exists to help you make thoughtful decisions about escalation
- Preview before escalating: Review the AI-generated summary before sending to your co-parent
- Build documentation: Regular journaling creates a helpful record over time
Parenting Wins
Parenting Wins
Celebrate Positive Co-Parenting Moments
The Parenting Wins is the positive counterpart to the Concern Journal — a shared space to acknowledge and celebrate when things go well. Research shows that positive reinforcement between co-parents significantly improves long-term cooperation and reduces conflict.
Shared by Default
Entries are visible to your co-parent, building mutual appreciation
Tamper-Evident Log
Every entry is timestamped and cryptographically secured — an undeletable record of wins
AI Suggestions
When a concern resolves positively, AI suggests adding it to the Parenting Wins
Timeline View
See your wins chronologically — great for reflecting on progress
Positive Reinforcement
What gets acknowledged gets repeated
Creating a Win Entry
- Go to Parenting Wins from the Tools menu or home page
- Click "New Win Entry"
- Select your co-parent as the recipient
- Write a specific title (e.g., "Thanks for the smooth handoff Tuesday")
- Describe what went well and why it mattered
- Choose a category (Punctuality, Communication, Flexibility, etc.)
- Optionally link to a resolved concern for context
- Save — your co-parent is notified automatically
Viewing & Managing Wins
- List View: Browse all wins with category filters
- Timeline: Chronological view grouped by month
- Detail View: Full entry with security status and evidence link
- Soft Delete: Remove from view but keep in tamper-evident log
- Evidence: Auto-preserved in the Evidence Vault
Categories
Parenting Wins Tips
- Be specific: "Thanks for being on time" is good; "Thanks for being 10 minutes early so we didn't rush the kids" is better
- Act quickly: Acknowledge wins within a day or two while they're fresh
- Link to concerns: When a concern resolves well, create a win entry to close the loop positively
- Review the timeline: On tough days, look back at your win timeline for perspective
- Let AI help: When AI suggests a win from a resolved concern, take the suggestion — it's often spot-on
- Make it a habit: Regular acknowledgment builds a culture of appreciation
Protected Contact Gateway
Safe Email Communication
What is the Protected Contact Gateway?
The Protected Contact Gateway allows you to forward emails from your co-parent (received in your regular inbox) to a secure, monitored channel within CoParentCare. It automatically scans forwarded emails, detects actionable items (expenses, scheduling, achievements), and creates a documented record in your Evidence Vault. When you reply through the Gateway, your co-parent receives a professionally formatted email with a polite invitation to join CoParentCare for better communication.
Key Benefits
- Your Co-Parent Uses Email: They don't need to know about CoParentCare - they simply receive replies via email
- Automatic Documentation: All forwarded emails are preserved as evidence with tamper-proof timestamps
- AI-Powered Analysis: Automatically detects expenses, calendar events, child achievements, and scheduling requests
- Safe Reply System: Draft replies with AI assistance before sending - no accidental sends
- Gentle Onboarding: Every reply includes a polite invitation for your co-parent to join CoParentCare
- Chronology Integration: Messages automatically appear in your evidence chronology
How It Works
- Navigate to Settings → Gateway Settings
- Enable the gateway to get your unique forwarding email address
- Add your co-parent's email to "Expected Senders"
- When your co-parent emails you, forward their email to your Gateway address
- The AI processes the email and presents it in your Gateway Inbox
- Reply through CoParentCare - your co-parent receives a branded email reply
Using the Gateway Inbox
Message Statuses
Messages can be:
Unread Not yet viewed
Action Required Contains requests needing response
Flagged Marked as important
Archived Stored but hidden from active view
Routing Actions
When AI detects content in an email, you can:
- Create Invoice - Route expense requests to invoices
- Add to Calendar - Convert scheduling to calendar events
- Start Mediation - Escalate disputes to AI mediation
- Add Achievement - Save child milestones and report cards
Replying to Messages
The gateway provides a protected reply system:
- Click "Reply Safely" on any message
- Draft your response in the editor
- Use "Get AI Suggestion" for professional rewrite options
- Review and edit before finalizing
- Click "Send Final Reply" when ready
Gateway Tips
- You forward emails TO the gateway - your co-parent continues using regular email
- Set up email rules to auto-forward from your co-parent's address
- Check the AI-extracted actions before routing to ensure accuracy
- Archive resolved conversations to keep your inbox organized
- Use the Evidence Vault to view the full chronology of communications
- Your co-parent will see branded replies inviting them to join CoParentCare
Managing Friends
Friend Management
Manage Your Connections
Your connections on CoParentCare are managed through our friend system. Adding someone as a friend allows you to access shared tools and maintain a secure communication channel.
Adding a Friend
- Click on "Add Friend" in the navigation menu
- Search for the person by username or email
- Click "Send Friend Request" when you find them
- Wait for them to accept your request
Managing Friend Requests
- Navigate to the "Friends" section
- View incoming friend requests
- Accept or decline each request
- You can also cancel your own pending requests
Using the Friend Selector
- Look for the "Select Friend" dropdown in the Tools menu
- Choose the friend you want to interact with
- The system will remember your selection
- All tools will now be focused on this friend
Friend Management Tips
- Only add people you need to co-parent with as friends
- You can remove friends at any time if needed
- Adding someone as a friend gives them access to shared tools and information
Friend List Management
Jane Smith
Co-parentJohn Doe
Friend request pendingPosts & Feeds
Posts & Feeds
Creating and Interacting with Posts
CoParentCare allows you to share updates, thoughts, and important information through posts. You can also interact with posts from others by liking, commenting, and saving them for later.
Creating a Post
- Click on "Posts" in the navigation menu
- Select "New Post" from the dropdown
- Enter a title and content for your post
- Optionally, add media or attachments
- Click "Submit" to publish your post
Feeds and Navigation
CoParentCare offers different views for accessing posts:
- All Posts: See posts from everyone on the platform
- Feeds: Posts from people you follow
- My Posts: Only your own posts
- Liked Posts: Posts you've liked
- Saved Posts: Posts you've saved for later
Interacting with Posts
Liking
Click the heart icon to like a post. Click again to unlike.
Commenting
Add your thoughts by typing in the comment box below a post and pressing enter.
Saving
Click the bookmark icon to save a post for later reference.
Sharing
Use the share button to send a post to a specific friend.
Posts & Feeds Tips
- Keep posts relevant to co-parenting and family matters
- Use the search function to find specific posts by title or author
- Save important posts for easy reference later
- Remember that all posts should maintain a positive and constructive tone
Evidence Vault
Document & Preserve
What is the Evidence Vault?
The Evidence Vault is your secure repository for documenting and preserving all co-parenting communications and activities. It creates tamper-proof, timestamped records with cryptographic verification that can be invaluable for legal proceedings or simply maintaining accurate documentation of your co-parenting journey.
Key Features
- Hash-Chain Verification: Every record is cryptographically linked to prevent tampering
- Automatic Capture: Chat messages, invoices, calendar events, and more are automatically preserved
- Gateway Integration: External emails received via Protected Contact are automatically documented
- Chronology View: Timeline visualization of all events for easy reference
- Export Capabilities: Generate PDF reports for legal or personal use
Security
All evidence is stored with SHA-256 integrity hashes. Once recorded, entries cannot be modified or deleted, ensuring the authenticity of your documentation. Social authentication adds an extra layer of verification for sensitive actions.
Using the Evidence Vault
Viewing Chronology
Access the timeline view to see all events in chronological order. Filter by date range, event type, or co-parent.
Types of Evidence
The vault automatically captures:
• Chat messages and replies
• Invoice requests and approvals
• Calendar events and changes
• Parenting plan modifications
• Gateway email communications
• Resolution issue discussions
Importing App Statistics
Each app allows you to manually save a comprehensive statistics snapshot to the Evidence Vault. This preserves aggregated data, response times, and behavioral metrics as tamper-proof evidence.
- Calendar: Go to Calendar Statistics and click Add to Evidence. Captures approved, pending, and denied events with approval time metrics.
- Invoices: Go to Invoice Statistics and click Add to Evidence. Captures sent/received totals, status distribution, response times, and payment times.
- Parenting Plan: On the Parenting Plans list, click Add to Evidence on any plan card. Captures items, children, approval status, and response metrics.
- Mediation: On the Issue Resolution list, click Add to Evidence. Captures resolved/escalated counts, category breakdown, and response times.
- Children: On the Children Dashboard, click Add to Evidence. Captures child profiles, growth records, allergies, appointments, and school info.
Analytics & Insights
View patterns in communication frequency, response times, and dispute resolution metrics.
Exporting Evidence
Generate formatted reports for:
• Legal proceedings
• Mediation sessions
• Personal records
• Co-parenting reviews
Evidence Vault Tips
- Regularly review your chronology to ensure accuracy
- Use the export feature before legal proceedings
- Enable social authentication for added security
- The vault captures automatically - no manual action needed for individual records
- Use the Add to Evidence button in each app's statistics page to preserve aggregated behavioral data
- All entries are permanent and cannot be deleted
Settings & Privacy
Settings & Privacy
Managing Your Account
Take control of your CoParentCare experience by customizing your account settings, managing privacy preferences, and securing your personal information.
Account Settings
To manage your account settings:
- Click on your profile picture in the navigation bar
- Select "Settings" from the dropdown menu
- Update your profile information as needed
- Change your password regularly for security
- Configure your notification preferences
Privacy Controls
CoParentCare offers several privacy options:
- Profile Visibility: Control who can see your profile information
- Post Privacy: Choose who can view and interact with your posts
- Friend Requests: Manage who can send you friend requests
- Public Profile: Customize what appears on your public profile
Security Measures
Password Security
Use a strong, unique password and change it regularly.
Login Monitoring
Monitor your account access and be alert to any unauthorized activity.
Security Verification
Set up additional verification for sensitive actions like approving parenting plans.
Settings & Privacy Tips
- Review your privacy settings regularly
- Update your contact information if it changes
- Be mindful of what you share on your public profile
- Use the "Contact Us" feature if you need help with account settings
Need Additional Help?
If you have any questions or need further assistance with CoParentCare, we're here to help. Our support team is ready to assist you with any issues or inquiries you may have.
Contact Support